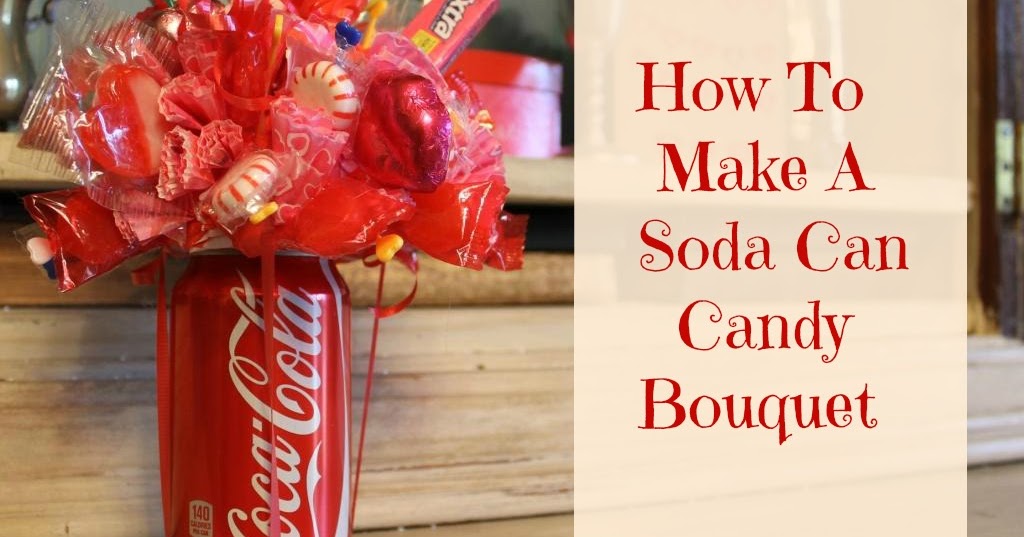
How To Make A Soda Can Candy Bouquet
This is a fun project to make for party favors, teachers' gifts, or craft bazaars (which is what I am making them for). The fundraiser at my church is a few days before Valentine's Day so I made these with that theme in mind.
This is an idea that is adapted from a blog post by Abby Lyn at
All of the supplies for this project came from the Dollar Tree (except for the actual Coke...they only sell the larger size bottles and not cans at the Dollar Tree I go to.)
I got enough supplies to make four bouquets. Most, but not all of these items got used. If you divide the costs between the bouquets, the cost per bouquet would be about $5 each.
To make the base for the bouquet start by cutting the foam balls in half.
Wrap the cut balls in paper so the foam will be covered. I thought that two cupcake papers would cover the foam but they were too small. I ended up cutting open a printed bag and wrapping the half ball with it like a present.
Use a ribbon to tie the wrapped half ball on top of the unopened soda can TIGHTLY. Do two sets of ribbon ties so that the half ball won't slip off one side or the other. By attaching the bouquet base this way, the recipient can actually get to the top of the soda can to drink it by cutting the ribbons on the side of the can and taking off the bouquet.
For a little added protection, I also glued the ribbons to the bottom of the can on the bottom rim and on the edge of the can where the color starts. Your half ball base needs to be secure or it might fall off when the candy is added.
To add height to the individual candy and gum, plastic picks were glued and taped onto the treats .
In the kitchen area of Dollar Tree, I found these plastic picks with hearts on the end.
These chubbier picks are from the cupcake paper kits.
The attaching of the candy to the picks is not the fun part of the project. Because the glue would be close to the edible items, I wanted to use a glue that would not possibly melt the wrapper or have chemicals that might leech into the candy, etc. The Dollar Tree while glue in the office supply section said "non-toxic".
First, glue the pick onto the candy wrapper and then add a piece of CLEAR tape on top of that. It seemed like neither the glue or tape alone held quite as well as both together. If you have to choose one or the other, the tape is better.
You can talk on the phone or watch TV while you do this part of the project. If you are doing more than a few of these bouquets, it might be fun to have some friends come over and do them assembly-line style.
The larger suckers were not the right color for my Valentine theme so I covered them with the cute sack paper and tied with a ribbon.
When your candy seems secure on the pick, you can start adding them to the foam base. Start with the largest items.
Because this is a "soda" bouquet, I added a crazy straw for fun.
You might want to have a "front" of the bouquet to put your best pieces toward that side of the ball.
After the larger pieces are in the foam, start adding the smaller candy to fill in blank spots. Push the candies in by putting pressure on the pick and not by the candy itself.
After you give each bouquet its "share" of the candy, you might still have some blank spots. Since the foam is covered, it really doesn't look bad.
If you are giving this to a guy or don't want to fool with covering more of the foam, you don't have to add these frills...but they are cute.
I got the idea for these frills by combining Debbie's (at ) techniques for using cupcake papers to make little flower-like embellishments and also her coffee filter wreath. 1. Start by making the wrapper flat and then folding in half 2. Fold it in half again 3. Fold that in half again 4. Fold about 1/2" of the pointed tip sideways and add a dollop of hot glue to the outside surface of the tip
Push the wrapper with the hot glue end down at a
blank space to attach it to the foam base. Depending on how large of a blank space you are trying to cover, you may want more than one of these frills in a space.
If you want some of your frills higher than others, you can tape them onto toothpicks then stick the toothpick into the foam at the height you want.
Here's how the bouquet looks with "all the frills upon it".
You could adapt the colors and items in the bouquet (even the actual type of soda) to fit other themes or holidays.
